Stitching on paper, it’s a beautiful detail to add to your paper craft projects, but it can be tricky and quite overwhelming if you haven’t tried it before. If you’d love to add stitching to your cards, scrapbook pages or journals and you’re not sure where to start, you’re in the right place. Welcome to my ULTIMATE guide for how to stitch on paper, like a pro. These tips work on all kinds of projects from cards to scrapbook layouts. I’ll show you exactly how I do it on my projects including my machine settings and I’ll also share the one big mistake that you’ll want to avoid!
First up, supplies, here’s what you need to get started:
The Perfect Sewing Machine
It’s best to have a dedicated machine for stitching on paper and ideally one that has a variety of stitches you can use. It doesn’t need to be expensive, BUT it should be a reliable, quality machine. I’ve had this one for YEARS!! My go-to brand is Janome. Learn more about the exact model I would suggest here. It has 30 stitches, easy reverse and an easy to read LCD Display.
Compare and review even more Janome machine options here.
Needle Threader – A MUST HAVE if you find it difficut to see the needle or have shaky hands.
Needles and Thread – To create the same look I get on my projects, you’ll need these special needles and this matching White thread. I also love this Pink thread. Note – this is not regular sewing thread, I prefer this one as it is thicker and works on paper beautifully.
You will need a set of sewing scissors and tools for working with threads and fabric. Keep your paper scissors just for paper. This set is ideal because it includes everything you need including a tool to un-do any mistakes you make; perfect for beginners!
Residue Eraser – Removes sticky things like glue and tape which your machine won’t like. A MUST HAVE for new sewists! If you ONLY get one thing from this list, this is it! (Learn more by watching the video linked below)
To store these supplies, I’d recommend a Sewing Box Organiser like these: 1. Very popular Tackle Box Style – 3 layers. Comes in a bunch of colours including white and Pink. 2. Plastic Box Style – I have something like this one.
*Please note: Descriptions contains affiliate links. If you take action after clicking a link, (buy something or sign up for example) I will earn a small commission. By doing so you are helping to support the blog. Rest assured that I only link to products I personally use, trust and love. As an Amazon Associate I earn from qualifying purchases.
Now that you have everything you need, watch this video to learn all of my tips and tricks:
Have you ever wanted to create something special but couldn’t find the perfect stamp or pattern paper? Do you spend more time looking for supplies than creating with them? Ever purchased the same product TWICE because you didn’t realise you already had one in your stash? Me too.
Imagine a craft space where every item has a home, you know what you have AND things are stored in a way that matches your creative process!! How much would that change your crafting life 🙌 I’ve been really focussed on clearing out the clutter this past year and I am LOVING how my craft room feels. It’s such a calming and creative space to be in and has allowed my creativity to soar!
I really want you to feel the same way in your craft space, so… I’ve put together this list of my absolute favourite organisation pieces. These are the things I could NOT do without in my space and I hope they help you create a space you love too!
Washi Tape Storage Box. Stackable, durable and clear so you can see your entire collection. Made to fit narrow and wide Washi tapes for Scrapbooking, Journalling, Card Making and more!
Large Mesh Pouches PERFECT for storing 12 x 12 papers and Scrapbook Collections. Beautiful quality zippered mesh pouches that allow you to see whats inside. These store upright in IKEA shelving units and allow you quick access to your favourite supplies.
Scrapbook pages need to be protected. You can store your pages into these D-Ring Scrapbook Albums available in every colour of the rainbow. I love that they co-ordinate with every decor so you can also use them as a coffee table book allowing you to share your creations with friends and family.
How CLEVER are these Clear Shelf Dividers? They are super durable, made of high quality clear plastic and allow you to divide up the space on shelves for better organization. These ones simply slide over the bottom part of the shelf snuggly so they are very secure and stay in place. I use them to organise my stamp platforms and punch boards and to organise my 12 x 12 papers and store them vertically. These are a MUST HAVE!**
These large rolling Clear Bins are made for fridge organization but they are FANTASTIC for storing 12 x 12 papers and allow you to flip through collections easily. They are super sturdy and have side handles so you can easily move them around your space.
This White Wooden Desk Organiser can also be wall mounted and is the PERFECT spot for keeping new scrapbook and card making supplies. Made of solid wood and designed to have a vintage (worn) feel, I use it to store brand new supplies as they come into my space.
This 3-Draw Stackable Storage unit is a MUST HAVE in any paper crafters space. Fits 12×12 papers along with co-ordinating supplies so you have everything you need stored in one place. Draws are very generous in size which makes this storage piece a great investment.
Display your pages in these quality frames made for 12 x 12 Scrapbook layouts. They come in Black, White or Gold to suit any decor and come in a lovely clean style so as not to distract from the artwork displayed inside. These are AMAZON best sellers and I know why!
Sequins have never looked so good PERFECTLY stored in this bead storage tray. Each section is easily removable and changeable giving you ultimate control over what goes where. Made of clear plastic so you can easily see your pretty collection.
*Please note: Descriptions contains affiliate links. If you take action after clicking a link, (buy something or sign up for example) I will earn a small commission. By doing so you are helping to support the blog. Rest assured that I only link to products I personally use, trust and love. As an Amazon Associate I earn from qualifying purchases.
The BEST Budget Craft Room Organisation (from Amazon) ever!
Having clever organisation is a great way to organise your space… BUT it’s not always the biggest problem. Often, crafters simply have too much STUFF and no amount of organisation can fix that. If you’re looking to declutter or downsize your stash, I’ve found a way for you to create a Clutter Free craft room in just 15 minutes a day. These simple ideas will help you transform your craft room into a space you love. Learn more about Creating a Clutter Free Craft Room in my course here.
How are you all? Gwen with you on the blog today, and I have something I’ve been asked about A LOT! I’m frequently getting messages for ideas on Easy Summer Scrapbook Pages you can make with cut files. So I thought, why not give you a whole bunch of Summer layout ideas to get you inspired! Cut Files really are so flexible and useful, which is why I love them so much and like many of you, I have a bunch of Summer photos to Scrapbook so let’s combine the two to get you inspired!
First up though, do you love FREEBIES? Make sure you sign up for our Cut File lovers Newsletters, I send free SVG designs every month, so you will want to jump on that! You can sign up HERE.
12 Easy Summer Scrapbook Pages + Fun FREE Cut File.
Now, onto the ideas I have for you… I challenge you to give them all a try!
#1 Add a Sun Burst element to your page. OK, so I know technically this one isn’t a ‘Summer’ page, BUT nothing says summer like a burst of Sunshine right? This simple detail has been added using a 12×12 Mask and a pretty pink shade of mixed media spray from my stash. Love the title for this page? It’s our ‘You Are Special‘ design which you can grab for FREE right HERE.
#2 Think Sunshine and Cute Clouds For this page, I’ve featured the ‘Sunny Skies‘ background cut nice and large as a starting point. I adore the sweet open clouds in this cut file which you can back with pattern paper OR leave open to show off your background. I’ve gone with a mix of open and backed clouds in this layout.
#3 Rainbows for the win. Not all Summer layouts need to have photos on the beach and Sunshine. This layout documents a Summer holiday using soft pastel supplies and this sweet ‘Rainbow Love‘ cut file design. The addition of the bright yellow Sun die cut and sweet raindrop pattern paper by Cocoa Vanilla Studio really pull this page together.
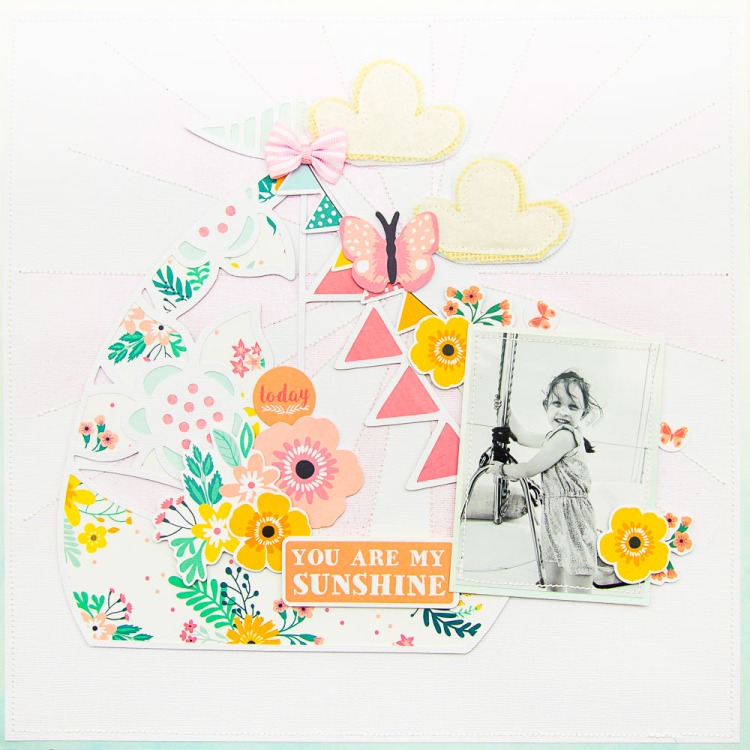
#4 Flowers work in every season. For this layout, I’ve pulled out bright and happy supplies and backed the ‘Simply Floral Pendent‘ design in all the colours. This design works best cut nice and large and is quick and easy to back. It’s also a fun way to use up paper scraps. Mix and match your bright papers and add in fun Summer die cuts like these sunglasses to pull the page together.
#5 Summer Ombre. It’s not just the ‘Summer Vibes‘ title that screams Summer on this page, it’s that stunning ombre background. I just adore the sunset feel to this page created by adding a clean white Sun shaped cut file on top of the bright background. This page came together in no time as it didn’t need a lot of embellishing after the large cut file detail had been added. I am also really loving the open space that has been left in the photo. The horizon really feels like it stretches out across the page.
#6 Say it in your title. Cut file titles like this ‘Summer Days‘ design are such a great deal! Super inexpensive when compared to alternative alphabets, they can tell the story of your layout in one or two words simply and easily. I’ve backed this one in a single piece of pattern paper and added directly to the background of my page. I’ve then simply added my photo and some die cut elements and the page was complete.
#7 Double it up! For this layout, the large feature cut file ‘Go See Do‘ is the perfect height for my two 4×4 photos. I love how the large title balances out the two photos to create a very centred design. This might be a Traveller’s Notebook cut file, but backed with bright Summer pattern papers, it fits on this 12 x 12 layout perfectly.
#8 White on White. There is something striking about a white cut file on a white background. This cut file ‘Open Leaf‘ is a great choice as the extra detail in the design really set the page off. It adds real texture and interest that I just love and helps the black elements on this page to really pop!
#9 Cut out of pattern paper. This cut file design ‘Scallop Banners‘ has been cut from pattern paper. Not only does it add a striking element to the page, but saves you creating time. No need to back, simply add directly onto your page, add photos and a few embellishments and you are done!
#10 On a dark background. Placing white cut files over a dark or bold background adds a striking element to any page. For this layout, I’ve used the ‘Sunshine background‘ design cut in a lovely ombre pattern paper and then layered the ‘Lazy Summer Days‘ title on top.
#11 Soft and Sweet. Summer layouts don’t have to be filled with bright and bold colours, often I love to use softer tones for a washed out Summer look. This happy snap of my daughter and I was calling for pastels, teamed with a fun title cut file ‘Vacay Mode‘ I love the relaxed feel to this page.
#12 To help create a scene. The photo in this layout was taken on a sailing boat, but you can’t really tell that from the photo, especially at first glance. The ‘Set Sail‘ cut file design really helps the viewer to get a feel for where the photo was taken, it helps set the scene for this fun Summer layout.
BONUS! #13 As a large background feature. The ‘Makin Waves‘ cut file used here really creates a striking element on this simple page design. It’s simply been cut in white cardstock and then coloured with tones of Blue and Green and then layered onto the background. I’ve then added this sweet photo of my husband and I on family vacation and some ocean inspired embellishments to finish off the page.
And there you have it… some really fun Summer layout projects you can create with your Cricut or Silhouette machine and CUT to YOU cut files. You can shop all of these design here and if you haven’t already, grab your FREE design by signing up to our cut file lovers newsletter here.
I hope this list really helps to give you some ideas for creating with the designs, they really are so versatile!
How are you all? Gwen with you on the blog today, and I have something fun to share. We are about to kick off our Summer holidays here in Australia and with school finishing up, I’ve actually been ordering books for next year and planning out my daughters subject selections. It won’t be long before we are all talking about heading back to school, so if you’re looking for Fun and Easy School themed Scrapbook Page Ideas you’ve come to the right place! Like many of you, I have a bunch of school-themed photos to Scrapbook so let’s get you inspired!
First up though, do you love FREEBIES? Make sure you sign up for our Cut File lovers Newsletters, I send free SVG designs every month, so you will want to jump on that! You can sign up HERE.
10 Back to School Scrapbooking Ideas + FREE Cut File.
Now, onto the ideas I have for you… I challenge you to give them all a try!
#1 Your FREE cut file design. OK, so I know technically this one isn’t a ‘School-themed’ page, BUT I wanted to get you some inspiration using the free SVG design I mentioned above. This layout documents a sweet mother/daughter moment. Love the title for this page? It’s our ‘You Are Special‘ design which you can grab for FREE right HERE. You could replicate this layout with a photo from a simple moment on a morning before school. What a lovely reminder to the student in your family to inspire them throughout their day.
#2 Documenting Class and Teacher details. I love documenting big and small details of school life. For this layout, I wanted to document my daughters school teacher and class details, they are hidden away underneath the cut file I’ve used on the background of this page. Cut file is called ‘School Books‘ which I’ve cut nice and large and then backed with pretty pattern papers. You could add in all kinds of details behind your book here, it’s a great way journal or document details in your photo.
#3 Documenting Progress through the grades. It’s obviously important to document each grade your student is in, but I also believe it’s also good to document where they are on their school journey. I created the cut file featured here to be able to do just that. It is called ‘Grade School‘ and the idea behind this one is to have the word ‘Grade’ at the top in one pattern paper and then to highlight the appropriate number each year. This design really is one that can be used over and over to document progress though each year level at school. For this layout, I was also keen to document my husband taking pictures by our front door, this is a real family tradition we have run with, so the journalling on this layout will talk more about our daughters progress through the grades at school and how she has grown and developed.
#4 Documenting School Sports. For this layout, I wanted to document a sports award my daughter achieved. I was not able to attend the sports event, so I snapped a couple of pictures as soon as we arrived home, making sure to take a close up of her medallion. To help tell my story, I’ve used the ‘Banner Trio‘ cut file design to replicate sports flags. For the title of my page I’ve used ‘Thickers’ to spell out the type of award she won.
#5 One for the Book lovers. There is no doubt that school life means a lot of reading and study. For my daughter, it also means a lot fun as she is real book worm. For this layout, I wanted to document a lovely moment she fell asleep reading with our pet cat. I actually created this SVG design for this very layout. It’s called ‘Book Lover‘ and consists of a title and some super fun books.
#6 Documenting Awards and Certificates. It’s not everyday that your little ones are awarded class prizes and certificates so these moments really are nice to document. It’s not always possible to get to the presentation so why not take a pic outside the class room to document this special achievement. This layout features our ‘Stars N Stripes‘ design and plays on the idea of being a SUPER Star!
#7 Selfie Love! There isn’t always someone handy to take a happy snap at school, so why not snap a quick selfie. I find the ones the kids take to be extra special. This fun photo was taken as a sneaky selfie in an open class parents were invited to attend to see student work. I just love how fun and playful it is. Cut file design featured is ‘Floral Tags‘ which I’ve added into my paper layers.
#8 School Adventures. Not all learning experiences happen at school. For my daughter, school camp in Year 6 was a big deal, exciting and scary all wrapped up in one. It was really important for me to document all of these feelings along with the details of the camp. This photo was taken in the early hours of the morning just before she boarded a bus, looking at this page brings back so many memories!! I’ve created a pretty floral cluster to embellish this page featuring cut file leaves, for my layers. This cut file design is called ‘Leaf Duo‘ and can extend floral die cut pieces in your stash beautifully. Pre-cut out a bunch of these, I know you’ll find them handy as you are creating.
#9 Schools out for Summer. This layout celebrates summer vacay!!! There is nothing quite like that moment when school is out and it’s time for some fun 🙂 The best students are those who know how to work hard and can also rest and enjoy the Summer break. Cut file featured here is our ‘Vacay Mode‘ title design.
#10 Sticking with tradition. For this layout, I’m featuring a photo that is a real family tradition. Each year on the first day of school, I photograph my daughter standing on the front step of our house. As it’s turned out, we have lived here her whole life and it is so lovely to see the same door and background in each photo and simply watch her grow! I’ve featured here an exclusive cut file from our CUT of the MONTH Members club called ‘Eucalyptus Wreath’. If you’re looking for more info on that you’ll find more info here.
I hope this list really helps to give you some ideas for documenting school memories with SVG files, they really are so versatile!
Hey Creative Friends, I’ve been asked about this A LOT! I’m frequently getting messages for ideas on How to use Cut Files on scrapbooking layouts so I thought, why not give you a whole bunch of ideas to get you inspired! Cut Files really are so flexible and useful, which is why I love them so much! First up though, do you love FREEBIES? Make sure you sign up for our Cut File lovers Newsletters, I send two free designs every month, so you will want to jump on that! You can sign up HERE.
30 Ways to use Cut Files on your Scrapbook Layouts
Now, onto the ideas I have for you… I challenge you to give them all a try!
#1 As a layout title. Cut files make amazing layout titles that are super inexpensive and so so flexible. This design features the ‘You Are Special‘ cut file which you can grab for FREE HERE.
#2 Frame it! There are many cut file designs that feature frames. These designs are so great to work with because you have a ‘spot’ for your photos ready and waiting to go, who doesn’t love that! This balanced layout structure is a personal favourite. ‘Roses and Frames‘ design.
#3 As a repeating pattern. This ‘Smell the Roses‘ design has been repeated and positioned around the page for a really striking design feature. The roses direct the eye towards the centre of the page.
#4 Help document the details of your story. School photos can be tricky, years blend into the next after time. This ‘Grade School‘ cut file helps to document the details of the layout. By choosing pattern papers carefully, parts of the cut file design stand out and can really help the viewer quickly identify details in the story.
#5 Turn them into shaker pockets. Um… sequins, yes, please! For this page, I’ve cut the ‘Camera Beautiful You‘ design to fit the layout background. I’ve then backed with vellum and pattern paper and added sequins in between the layers to create a shaker pocket. So fun!
#6 White on White. There is something striking about a white cut file on a white background. This cut file ‘Garden Background‘ is a great choice as the extra detail in the design really set the page off. It adds real texture and interest that I just love.
#7 Double it up! For this layout, the large feature cut file (Floral Banner) has been cut twice, once in dark blue and secondly in white. The dark blue cut of the file acts as a shadow to the white design. It’s such a striking addition to this page.
#8 As a large background feature. The ‘Bows on Strings‘ cut file used here really creates a striking element on this simple page design. For interest, some of the bows have been backed in pattern paper, with others left open to show through to the background. A page like this is super quick to pull together.
#9 On a dark background. Placing white cut files over a dark or bold background adds a striking element to any page. The extra beauty of this technique is that no backing is required so if you are not a fan of fussy cutting, this tip is a winner. I’ve used the ‘Winter Wonderland‘ page builder file for this layout.
#10 Cut out of pattern paper. This cut file design has been cut from pattern paper. Not only does it add a striking element to the page, but saves time with no need to back it. Simply add to your page, add photos and a few embellishments and you are done! ‘Trio Flower Cluster‘ design.
#11 Be ‘punny’, it’s fun! The cut file ‘Brace Yourself‘ on this page is a fun pun that relates to the photos. It would also work for an adventure page, you can get really creative with your titles so go for it!
#12 Add a clean mixed media element – You can add all kinds of mixed media paints and sprays to your cut files. I love doing this and then adding them to a clean background for a clean mixed media look. For this page, I’ve added Distress Ink to several cuts of the ‘Celebration Flowers‘ files in various colours. I’ve added colour blocking for the embellishments and teamed this all with a black and white photo that pops!
#13 To help with your layout design. In this page, the cut file ‘Butterfly Garden‘ fills a large part of the page. When using files like this your design choices are limited, which actually helps pages come together faster. There are fewer embellishments required and limited photo positions available. This stops that shuffle I know you do (because I do it too!)
#14 Double Up! Using two different cut files on your page is double the fun! For this page, I’ve used both to help tell my story. The ‘Sunny Skies‘ design acts as a background and the ‘Summer Days‘ file is my page title.
#15 To add a bold feature title to your layout. Let’s face it, alphas such as ‘Thickers’ can be expensive, cut files give you a similar bold look at a fraction of the price. This ‘Traveller Background‘ is the perfect bold title for this vacation-inspired layout. I’ve layered it on top of the globe element from the same cut file and some watercolour inspired pattern paper for the win!
#16 To maximise negative space. This ‘Stitch Heart Geo‘ design was the perfect addition on this page to fill in the blank space of the background. These designs are also some of the easiest to work with as they simply need layering onto pattern paper. The paper shows through the design, no need for fussy cutting to get a ‘backed’ look!
#17 To reinforce your story. Every element on your scrapbook page should help you tell your story. In this page, the ‘Book Stack‘ design is a perfect fit for this photo at our local library.
#18 DIY inexpensive embellishments. The cut files in this layout may not be as noticeable as those in other pages shared here, but they are working just as hard. For this page, I simply cut out two leaf designs ‘Leaf Duo‘ and used them as a base for my embellishment cluster. Embellishments can be expensive so these leaf elements are a great option for those of us scrapping on a budget!
#19 To help create a scene. The photo in this layout was taken on a sailing boat, but you can’t really tell that from the photo, especially at first glance. The ‘Set Sail‘ cut file design really helps the viewer to get a feel for where the photo was taken, it helps set the scene of the photo to theme the page.
#20 To document small moments. This photo was just a quick snapshot, a silly photo of my daughter on her phone, but it tells a story of my Miss 13 and her love for technology. I love documenting the small moments in life as well as the big ones, it’s so important. The cut file ‘Chit Chat‘ I’ve used here expands on that idea, giving me a space for some typed journalling that fits in the theme.
#21 Use as a design element. Cut file designs don’t have to directly relate to your photo. More generic designs such as these ‘Quad Frames‘ are so versatile and can be used on so many different styles of pages. I’ve added them to this page as they help draw the eye to the central design elements and most importantly the photo.
#22 Go Monochromatic. For this layout, I’ve pulled a stack of a blue/green papers and elements in my stash to create this Monochromatic layout. I’ve mixed and matched the papers to back my ‘Happiness‘ cut file. It still surprises me just how few supplies you actually need when working with a cut file. They really extend your stash and this technique is a great way to stash bust!
#23 To document family holidays. Back from vacay and have a bunch of photos to scrapbook? Cut files can really help pull your pages together fast and give a consistent look in travel albums. This page features our ‘Makin Waves‘ design which has been coloured with watercolours. The waves in the design really fit with the Summer vacation theme and could easily be repeated throughout an album with a sailing or summer theme.
#24 To give your photos context. The ‘Conversation‘ cut file on this page not only acts as a wonderful background and base for my photos and embellishments for the layout but gives the photo context and helps tell the story.
#25 Add a repeated pattern. This ‘Speech Bubble‘ design has been cut twice to fill the centre of this layout. Many cut file designs can be cut out several times and then repeated on your page for a fun effect. Any repeated pattern can help your layout design feel more consistent.
#26 Colour blocking. Cut file are a great way to add clean colour blocking to your page. For this layout, I’ve used the ‘Intersecting Hearts‘ cut file which I’ve repeated down my page and then added a plain pattern paper to back them. This creates three blocks of colour which creates a base for my photos and embellishments.
#27 To document special occasions. I don’t know about you, but I find scrapbooking ‘special events’ so much harder than scrapbooking ‘everyday’ photos. The pressure to make the page ‘good enough’ for that special photo can seem overwhelming! This is where very specific cut file designs come in really handy. It doesn’t matter to me that I’ll possibly only ever use them once, they are so inexpensive it’s worth it to help me get that very special photo scrapbooked! Cut files used on this page are part of the ‘Christmas collection‘.
#28 Add Floral elements to your page. Flower embellishments can be expensive and can add a lot of bulk to your page. Floral Cut Files such as these ‘Lily of the Valley‘ can give that same look, especially when teamed with some fussy cut die cuts and layered leaves. I love that you can reuse these over and over and make them fit any scrapbook layout just by changing up the pattern papers you use to back them.
#29 Cut them up! You don’t have to use a cut file design as a whole element on your page. They are really great for chopping up and changing up the design. This file ‘Flowers and Frames‘ actually has two square photo boxes as part of it. I’ve chopped those off and used just the floral elements for this layout. Think outside the box and you can get several looks from the one design.
#30 To help you use up your stash. This layout is one from our KIT to YOU collection. These exclusive designs help you use up your stash with Step x Step instructions and a special ‘Shop your Stash’ section, so no going out for new supplies, you can use what you have! ‘Flower Band Kit‘. Find out more about KIT to YOU here.
I hope this list really helps to give you some ideas for creating with Cut Files, they really are so versatile! Just one more thing before you go… Now that you are all inspired and have a stack of layout ideas to try, why not download our FREE Project Planner Template?
Why not print out a bunch and get planning! If you’d love to have these in a pad format shipped to you, you can also shop them here!