LOVELY LIFE | GWEN WRUCK

Hey there Creative friends! I’m back with you today for some more Scrapbook inspiration. Today I’m diving deep into my stash and using one of my all-time favourite collections from Cocoa Vanilla Studio called ‘Bohemian Dream’. I’ve also pulled a sweet pic of Miss C taken a few years ago now. I’ve teamed it with the ‘Triangle Pinwheel‘ cut file which I’ve cut nice and large to create a background feature for my page. Lots more details to see below.

Here’s a closer look at the cut file I’ve used. This one is nice and fast to back and I think adds a really striking element to the page. If you are new to working with cut files, this one is a great one to get you started.

To create my page, I’ve begun by backing my cut file design, I’ve simply backed each triangle one by one mixing and matching pattern paper scraps. I wasn’t too careful about the colour placement, I just made sure that no two colours were side by side. I’ve then added this whole piece to the cardstock background of my layout and stitched around the edge.

Next, I’ve mounted my photo with a 1/4 inch frame and added some stitching. I’ve then locked in the position of my photo onto my page.

Next up, I’ve worked on my title. I knew I wanted to use a larger title for this design so it was important to get it into position early in the design process. I just love the bold white chipboard I’ve used here.

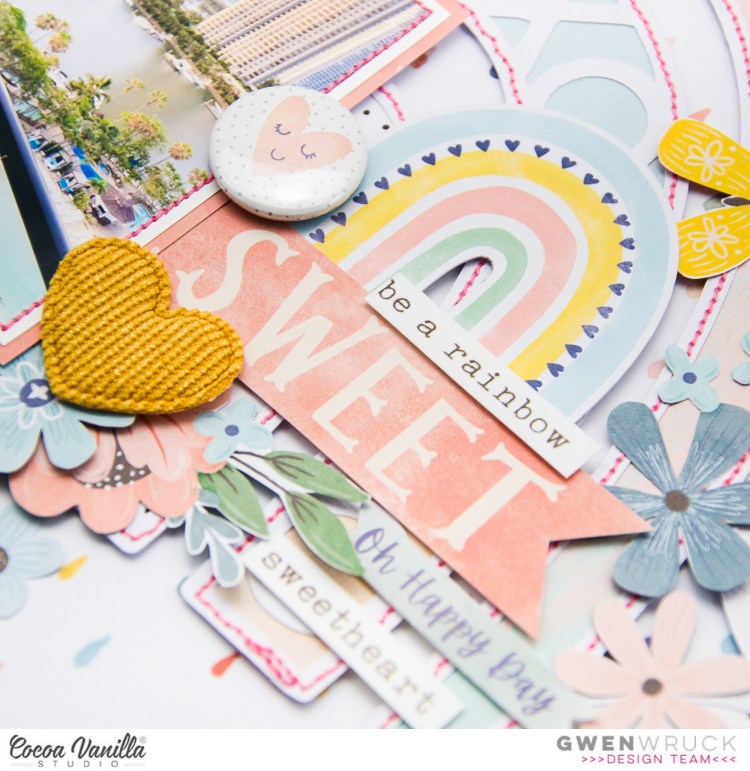
Next up, I’ve created my main embellishment cluster. I pulled this ‘Charm Creations‘ heart from my stash and added that to some die cut embellishments and a flair from the collection. I love the different textures here.

I’ve then gone ahead and added in two smaller embellishment clusters mainly made up of the die cut ephemera pieces and some word sentiments. Most I’ve added on 3D foam tape for dimension.

The clusters help draw the eye from the top left hand corner of the photo down to wards the bottom left hand corner of the page. I’ve kept them pretty simple as I didn’t want to cover up too much of my fun cut file background.

AND, that is the page complete. Thanks for popping by today creative friends, I hope this one has inspired you to get creating. As always, I love seeing what you make so be sure to tag me on social.

Until next time,

BE A RAINBOW | DAYDREAM | GWEN WRUCK

Hi Creative friends, I’m back on the blog today with a new share for Cocoa Vanilla Studio. This week the design team are all sharing projects inspired by Rainbows, how fun right! If you are a fan of Rainbows (and who isn’t) you’ll want to be sure to check out all of the projects, they are all stunners! I’m also using the new ‘Daydream’ collection which is so perfect for this theme. If you haven’t seen that yet, you can see an unboxing of it on my YouTube channel here.

Seeing our theme this week is ‘Rainbows’ I was super eager to use this fun Rainbow cut file, it’s called ‘Rainbow Love‘ and is from CUT to YOU. I’ve gone ahead and backed it with the ‘Sweet Serenity’ pattern paper. I’ve used both the A and B sides for this and then finished off my Rainbow cut file with some stitching in a pretty pink thread. I’ve then added foam tape to the back and positioned onto my background.

The background for the page is the ‘Sun Shower’ pattern paper, I adore the sweet little raindrop print on this one, the print is so fun for using as a background on your page.

Next, I wanted to position my photo… I do this early as I like to work from the largest elements to the smallest. I’ve chosen to place it on the left so that my daughter (in the picture) is looking in toward the centre of the layout.

Now I can get onto adding some pretty details. I’ve fussy cut out a stack of florals from the ‘Garden Variety’ pattern paper as well as some title elements from the ‘Happy Place’ Cut Apart sheet. I’ve added foam tape to some of these for dimension.

You can see below here that I’ve also added in a flair from the ‘flair pack’ and that cute heart from the ‘Puffy Hearts pack’, the hearts are so sweet and have an added gold detail.

Next, I’ve added in some typed sentiment stickers from the ‘Accessory Sticker Sheet’ and finished the page off with some fussy cut out moths from the ‘All A Flutter’ pattern paper. **TIP – Fussy cut out elements from pattern papers in advance, then you have a sweet stash to add to your page as you are creating.

Thanks for popping by today creative friends, I hope you have enjoyed seeing how I pulled my page together… I also have a YouTube process video up on my channel for this one which you can watch here. If it has inspired you in any way, please let me know by giving it a thumbs up 🙂 xox

Until next time,

SWEET AND SASSY | GWEN WRUCK

Hey there Creative friends! Gwen back with you today for some more Scrapbook inspiration. I hope you are ready for some bright fun Spring colours. It’s not long turned Spring here in Australia and I am so happy to be getting into some warmer weather and really enjoying creating with some bright fun colours. Today’s layout is a silly happy snap that was taken last Christmas by my daughter using one of those fun filters on her phone. I’ve teamed it with the ‘Hearts on Strings‘ cut file which I’ve cut nice and large to create a background feature for my page. Lots more details to see below.

Here is the cut file I’ve used… a really fun and simple design that was super easy to back and a fast way to get a page put together.

So, as I mentioned, the page began by cutting out the design nice and large. I’ve then taken a mix of the pattern papers from the collection and backed the hearts. I’ve not taken too much care with the colours, I was just careful to not have too many of the same colours grouped together. I’ve then placed foam tape behind the design and centred it onto my page.

Next, I’ve simply backed my photo with another pattern from the collection. It’s a really fun photo so I did want to play with the patterns on the page as well to create a fun feel for the layout. As you can see below, I’ve added my signature stitching detail to the photo as well.

To keep the design fairly simple, I’m working with my embellishment clusters positioned around the edges of the photo. I want to add this detail but I don’t want to cover up too much of the cut file in my background. It’s a bit of a balance here so I would recommend keeping that in mind when you are working with cut files as background features.

I decided on one large main cluster on the right of my photo and then two smaller ones (one on the left and one on the top) and these balance out the page nicely. I’ve really just mixed and matched elements from the collection until I was happy working largest elements to smallest.

I’ve finished off the page with the ‘Love you More’ die cut piece and a couple of fun red puffy hearts as well as these super sweet die-cut bees, so sweet!

Thanks for popping by today, I hope my page has inspired you in some way, be sure to tag me on social if it does so I can see what you have made!

Until next time,

LAZY SUMMER DAYS | ENDLESS SUMMER | GWEN WRUCK

Hi Creative friends, I’m back on the blog today with a new share for Cocoa Vanilla Studio and today, I’m playing along with their Throwback Thursday challenge. For this page, I was really inspired to use my stash of ‘Endless Summer‘. This collection is a few years old now but it’s still one of my absolute favourites, I love the warm tones of this line and as you’d expect it’s perfect to use for Summer adventures. This photo was also taken a few years back now on a family cruising holiday.

I started my page by working on the background first layering up the ‘Blue Skies’, ‘Sweet Treats’ and ‘Sunbleached’ pattern papers. To create the Sunshine rays, I’ve used a cut file from CUT to YOU called ‘Sunshine Background‘ and added stitching for a really sweet detail.

For my title, I’m working with another cut file, this one called ‘Lazy Summer Days‘ which I have backed with the ‘Blue Skies’ pattern paper and mounted on some foam for dimension.

I’ve kept things pretty simple with my photo for this one, no photo mat, just some of my signature stitching around the edge. It ties in nicely with the stitching in the sun rays. I’ve made sure to position my photo and large title first working on a design that flows with the rays of the sunshine in my background.

I’ve added lots of pretty embellishments to this page, there were so many wonderful goodies included in the collection, some still available online. I’ve used the ‘Puffy Stickers‘, ‘Accessory Stickers‘, Flair, Wood Veneer and Woodies.

To round out my title, I’ve taken a few elements from the ‘Ephemera Pack’ such as the cute banner pieces that say ‘Capture This’ and ‘Here’s the Story’. They are all in that lovely warm peach tone so fit perfectly. You can also see here the ‘Wood Veneer’ pieces and the enamel ‘Woodies’. I really just kept playing with the position of everything, adding bits and pieces until I was happy with the layout.

I’ve also created a YouTube video of my process which you can see here. Be sure to subscribe to my channel if you enjoy the video and it inspires you in some way 🙂

Thanks for popping by the blog today, I’d love to know, do you have some ‘Endless Summer’ collection in your stash? Why not pull it out and have a little stash bust creative time. I hope my layout has inspired you to get creating.

Until next time,

FAMILY MOMENTS | DAYDREAM | GWEN WRUCK

Hi Creative friends, I’m back on the blog today with a new share, this one for Cocoa Vanilla Studio using their brand new collection called ‘Day Dream’. This is the first layout I’ve created with this collection and I absolutely loved working with it, so soft and pretty! This week on the blog we are being inspired by the theme ‘Outdoor Adventures’ so I thought it would be fun to document a couple of photos from a recent family trip to Rainbow Beach.

The design of the page was inspired by my photos and this sweet pattern paper called ‘Over the Rainbow’. As soon as I saw the pattern paper, the idea popped into my head to make a little scene of sorts with the rainbow crossing over the sky in my pics.

I began by fussy cutting out the rainbow design and then placing it onto the ‘Sweet Serenity’ pattern paper and adding stitching along each of the rainbow arcs. Next, I’ve positioned my photos underneath the rainbow, mounting on the ‘Garden Variety’ pattern paper from the 6×8 paper pad. I love using the paper pad to back my photos as the prints in the designs are smaller and they translate really well as photo mats. I’ve raised my photos up on foam for dimension.

I’ve then gone ahead and placed the larger die-cut pieces, the florals are from the ‘Ephemera Pack’ and the title is from the ‘Die Cut Titles’ pack. Placing the larger elements first helps the page come together quickly. I’ve also raised some of these elements up on foam tape for dimension. I love mixing and matching the heights of elements on my page.

I’ve then worked on creating my ‘flowing clusters’ as I like to call them… clusters of embellishments that draw the eye around the page.

I’ve used a combination of elements from the ‘Accessory Sticker sheet’, ‘Die Cut Ephemera pack’ and the ‘Flair button pack’ to create one main cluster and two smaller ones that draw the eye from the top of the rainbow down to the photos.

To finish the page off, I’ve fussy cut out three of the cute moth elements from the ‘All Aflutter’ pattern paper and two of the cute hearts from the ‘Puffy Hearts’ pack, these smaller elements add texture and interest and finish off the page really nicely.

Thanks for popping by today, I hope this inspires you to take a look at the latest collection and add it to your stash, it’s shipping now so be sure ask for it at your local store. I’ve also created a YouTube process video for this layout if you’d like to see how it all came together. Check that out below or by clicking here.

Until next time,