“Smile” for Scrap the Girls September 2019

Hi Creative Friends,

The first of the month means it’s time to share another fab challenge at Scrap the Girls.  This month we are being inspired by a sketch, this one created by the fabulous Sue Plumb.  I will admit I was a little worried about this one to start due to all that ‘mixed media’ in the background, but as always, found a way to make it “me”.  I know I say this a lot, but it’s important to stay true to you and what you like; even when working with a challenge or theme.  Here’s my page:

and this is the sketch Sue created.

Ok… so, as you can see, I did go a little off track with the sketch, but I promise the inspiration for my page started with it.  I think it’s totally fine to change up some elements of a sketch to make it your own, so here’s what I’ve changed.  Firstly, the photo… I didn’t have a 6×4 landscape to use so I’ve gone with a square 4×4 image.

Secondly, because I had some space to the left of my photo that wasn’t in the sketch, I’ve added a much larger banner element than what is pictured in the sketch, I’ve just mixed up the proportions here.  Lastly, I’ve used a cut file which I’ve misted with some shimmer spray as a substitute for some of the mixed media.  Those of you know me, know I’m a very clean scrapper, so I’ve gone with the cut file in lieu of some of the mixed media, but you can still see I’ve added it in keeping with the sketch. You can shop the cut file here.

The collection I’ve used for this one is by Echo Park and it’s called ‘Teen Spirit’; I love the fun feel to this collection!  So fun to use something light-hearted to document Miss 12.  I can see quite a few more pages being made with this collection because there really isn’t a lot of scrapbooking products like these on the market.

My process for the page started with my photo, I’ve mounted that with some bright pink pattern paper from the collection and then built a photo mat/centre feature that was loosely based on the sketch.  I’ve just kept building it until I was happy and then once that was locked in, I had a framework for the cut file and watercolour background.

When working on my background, I have kept bringing back my photo elements to see how much of the watercolour was showing.   I like to do backgrounds like this because it helps me to see where to put the colour and when to stop!  If I don’t do it this way, I end up with way too much on my background and have to start again.  With my background all locked in, I can then add my photo base and then lots of other little bits and pieces from the collection until the page was complete.

Be sure to upload to the Facebook group by the end of the month for your chance to win a prize pack from this months sponsor.

This month’s sponsor: Charm Creations

Until next time,


OH SO LOVELY | CUT TO YOU

Hi Creative Friends,

I’m up on the CUT to YOU blog today with a new share playing with some newly purchased scrappy goodies!  There is nothing quite like new supplies and fresh-cut cut files to get you inspired right!  Here is what I’ve created.

The idea for this page actually came from my photo and the sentiment from Pink Fresh Studio which says “You are my favourite notification”…. Miss 12 is ALL ABOUT her photo at the moment so it was very cute to document her on her phone instead of chatting to me on a recent ‘coffee date’ and that sentiment said it all 🙂  I’ve teamed it with two cut files, the first was the ‘Open Leaf‘ which I really just wanted to use a background layer and interest for my page and the ‘Oh So Lovely‘ sentiment title which yes, I’ve used as a title.

I’ve simply backed each of these in the pattern papers, I’ve chosen quite plain designs as I really wanted this page to have a clean and simple look about it.  I knew I had the four photo collage as my photo to work with and didn’t want those four images cluttered by bold pattern papers.  Oh, I did add some stitching, along the centre of the ‘Open Leaf’ design.

I’ve created the page as I normally would, first starting with the cut files, backing them and then nutting out the layout design.  Normally that means positioning my photo first, but in this case, as I knew for sure I wanted to use that sentiment, it was a matter of positioning the sentiment, my photo and the cute Open Leaf cut file.  Next, I positioned my title.

I like to lock in the position of larger elements first when designing the layout for page as I find if I leave these bigger pieces until later on, they rarely fit.  Using them first up really guides me in the design.  With all that locked in and looking good, it was now just a matter of adding in the smaller elements to finish off the page.

Here is a close up of the title… I have backed it here on foam tape for added dimension and love the shadow it creates when I do this.


The extra embellishments rounded out my page nicely and I’ve called it done.  I love the softness and clean lines of this one.

Thanks for popping by today,

Until next time,

DREAM LOVE | BOHEMIAN DREAM | GWEN WRUCK

Hi Creative Friends,

I hope you are having a wonderful day, thanks for popping by the blog!  I’m sharing for Cocoa Vanilla Studio today a new layout featuring my favourite CVS collection of all time ‘Bohemian Dream‘.  It’s crazy to me that I call it that, as I’m not normally a lover of purple, but this collection just nails it for me! I’ve paired it with a CUT to YOU cut file, this one called ‘Butterfly Garden‘, to document a sweet photo of my little miss.

I didn’t really have a story to document with this photo, it was taken on a random day, but these are actually my favourite kinds of photos to scrap.  I use them in my albums to share with my daughter just how loved she is.  I love that when she flips the pages she can see lovely messages about living her dream, shining bright and that she is so loved and this collection for me is perfect for doing that!

Ok, so onto the layout!  I started by backing my cut file.  I’ve used a combination of the ‘Abstract‘ paper and the ‘Abundant‘ paper to add stripes to my butterflies.  Yes, this took a while, but I think the end result is worth it.  Once that was done, I’ve used some watercolours to add patches of watercolour over some of the flowers on the cut file.  I’ve also left some of the flowers plain white.

Next, I’ve matted my photo, I’ve used more of the ‘Abstract‘ paper for this and stitched around the edge as I do with most of my layouts.  It was now time to think about the background of my page.  For this, I’ve grabbed a plain white piece of cardstock and added more of the same watercolours that I used on the cut file.  I think this helps the page come together with a consistent look.  Once happy with the watercolour background, I’ve mounted the entire sheet onto more of the ‘Abundant‘ paper and stitched around the edge.

With the background looking good, and the cut file done, it was now time to bring everything together.  I’ve mounted the cut file piece onto some foam tape and added to my background.  I’ve then added in my photo, mounting it as well for extra dimension.

Now for the fun bit!  I’ve gone through all of the wonderful bits and pieces from the collection to see what I could add to my page.  I’ve started with the ‘Ephemera Pack‘ as well as the ‘Flair Buttons‘.  I’ve grabbed my title from the chipboard embellishment pack and also added some stickers from the ‘Accessory Stickers‘ sheet.

I’ve just pulled out anything I think would fit and then auditioned them in various spots all over my page.  I must say, I am totally crushing on the watercolour flowers in this collection, they really suit this layout with the other watercolour elements I’ve added.  I’ve finished off the page with some enamel dots and a plain white button from my stash.

Thanks for popping by today to see my latest project.  I really enjoyed putting this one together, even though it did take a little while with the details of the cut file! If you don’t have any of the Bohemian Dream collection yet I urge you to go and grab some while you still can, it really is a beautiful collection!

Until next time,

SO FUN | CUT TO YOU

Hi Creative Friends,

I’m up on the CUT to YOU blog today with a new share!  I’ve been absolutely itching to use the new Butterfly Cluster cut file for a sweet page of Miss C and me… I just love this cut file so much!  I love how versatile it is and how you can mix and match the layers and parts of the cut file to suit your project.  Here is what I’ve made.

To start my page, I’ve cut the cut file out twice.  Firstly with a pale pink cardstock and the second time with white cardstock.  I had an idea to use the white as my background and the pink as the butterfly inserts for the page.  You could absolutely mix and match here with pattern papers or even vellum for lots of different page themes.

I’ve backed the white cardstock with a bold print, this one from Maggie Holmes Crate Paper.  The idea for choosing something bold was to help the block shape of the butterflies stand out.  I also wanted to make sure I made a contrast between the background, the backed paper design and the pink sections of the butterflies.

This cut file is super fast to back, so if you are new to using them on your projects I would definitely recommend this one!  Once My cut file was all sorted and looking good, it was time to back my photo.  For this, I’ve used the same pink cardstock.  I wanted to make pink my highlight colour and using it around the photo really helps draw your eye to it.  It’s one thing to have a pretty cut file on your page, but you don’t want it to be so detailed or distracting that you are drawn to it over your precious photos!

It was now time to stitch!  I’ve hand stitched the elements in the die cut with some embroidery thread, again, using pink.  I’ve also stitched with my sewing machine around the edge of my photo and my layout to bring it all together.  I’ve then mounted my photo onto foam for dimension and added to my page.

At this stage, the page was really coming together.  It was now time for a title and some finishing touches.  I’ve gone with a chipboard title from the same collection as my pattern paper for consistency.  I’ve also just had a big dig through my stash for anything in the blue/green tone that would match.  Another great reason to invest in cut files…. they really do help you bust the smaller elements of your stash.  Adding a cut file to a small selection of embellishments really does pull a page together.


Once all of my elements were added the page was done!  This really did come together quickly and I just love how it turned out.

You can see the latest designs from CUT to YOU here, ohh so many options to choose from.

Until next time,

SISTERS | HAPPINESS | GWEN WRUCK

Hi Creative Friends,

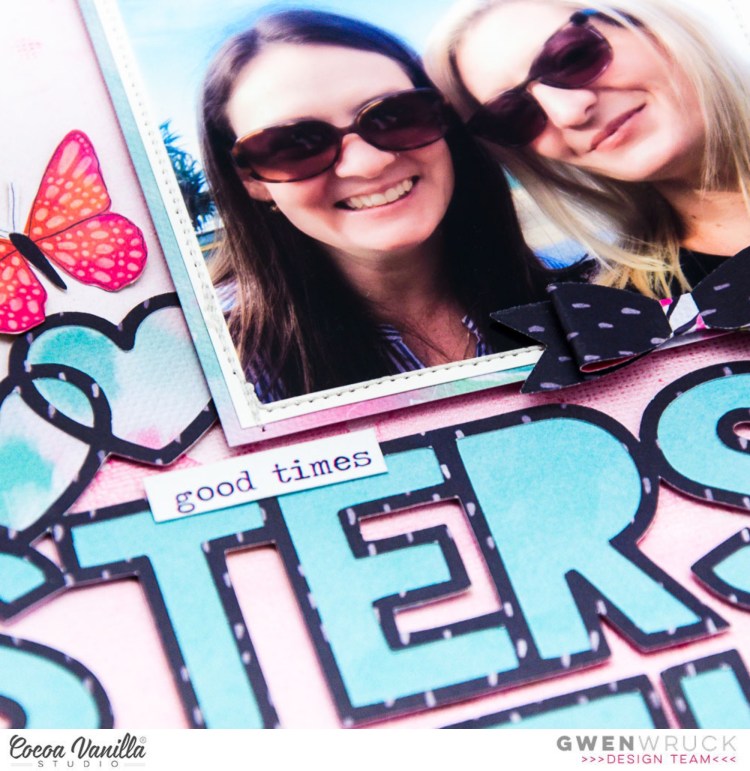
I’m sharing for Cocoa Vanilla Studio today a very special page.  Today is International Sister’s day and to celebrate, I’ve created a page that documents my relationship with my sister.   It features the stunning ‘Happiness’ collection and a photo taken with my sister at a lunch outing we had recently.

The inspiration for this page absolutely started with my photo.  I love how blue that sky is behind us and was immediately drawn to the blue watercolour design of the ‘Good Times’ pattern paper.  I then took a cut file from my stash, this one from CUT to YOU as it was perfect for today’s theme celebrating sisters.  I’ve cut it out as a statement title for my page using the ‘Botanical Bliss’ pattern paper.  I wanted a real contrast between the file and the background for my layout which I had planned to make white.  I backed it with the stunning blue watercolour pattern paper; ‘Good Times’.

With my cut file sorted, I went to work on the design of my page.  I mounted my photo with the ‘Expressive’ pattern paper and then backed on foam for dimension and added machine stitching.  Once I was sure where these large elements were going to go, the page looked a little too plain for what I had in mind, so I thought it might be fun to add a little bit of mixed media onto my background.

I’ve added clear gesso to some thick white cardstock and then used some mists, spraying and moving around the colour until I was happy.  I like my mixed media to be a little subtle and soft, but do love the addition it makes to this page.  It adds another layer of detail and softens the plain white background I had previously.

Once my background was dry, I’ve added my cut file (with foam tape for dimension) and my photo… Now it was time for some embellishing!

I began by fussy cutting out some pink butterflies from the ‘Bright and Beautiful’ pattern paper.  I also pulled out some of the floral pieces from the ‘Die Cut Ephemera’ pack.  I then went about creating a floral cluster down the right hand side of my photo.  I then scattered the butterflies over my page and added a few more elements from the Die Cut Ephemera pack. The bow you see below has been cut with a die with some of the scrap ‘Botanical Bliss’ pattern paper.

To finish the page off, I’ve grabbed some sentiment stickers from the ‘Accessory Sticker Sheet’ and added.

Thanks for popping by today to see my latest project.  I hope my page inspires you to get creative with the ‘Happiness’ collection, it is one of my favourites!  And, if you have a sister, why not create a special page to celebrate her; I bet she’s awesome like mine! xo

Until next time,

error: