“Beautiful Moments” for Scrap the Girls June 2019

Hi Creative Friends,

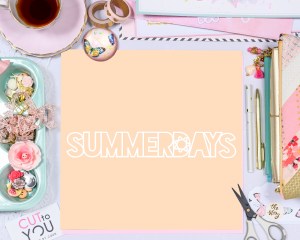
June is here and it’s time to share another fab challenge at Scrap the Girls.  This month we are being inspired by this divine mood board filled with gorgeous florals and bold colours.

and here is my layout!

I am so in love with this mood-board, I think there are so many beautiful things to be inspired by, I actually started the page by pulling out a stack of scraps of pattern paper that fit the theme.  I had a lot of papers that weren’t really enough to make a full page with, but I could cut them into 8cm squares and combine them.  I also pulled out the Jen Hadfield collection ‘Patio Party’ which has some stunning bold floral patterns in it and the most divine pop of yellow which I pulled from those cute yellow clogs!

I began with a white background to ground all of my patterns and colours and mounted it onto one of the bold patterns from the Jen Hadfield collection.  I then went about building up a paper stack of my scraps. I also stitched around the 8cm square pieces for extra detail and also mounted my small photos in coordinating papers.

You can also see here, that I’ve added in a piece of chipboard from my stash, just as another layer. This page is really all about the layers!  Layers of pattern paper, layers of embellishments and layers in my photos.  Inspired by the mood board and the layers of fabric in the clothes and handbags.

Once I was happy with all my paper layers and the position of my photos, it was time to embellish!  I wanted to add to the florals in my pattern paper so I’ve added in a stack of die cuts from the Jen Hadfield die cut pack.  I’ve just positioned them in between my layers.  I’ve also added in a couple of digital cut file elements; these are from the ‘Caite Floral Set‘ from CUT to YOU.  I’ve misted them with some Colour Shimmer Sprays from Colour Blast.

With the two floral clusters sorted, it was time to add in my title.  For this, I’ve gone with a pop of black, to draw from the black in the photos as well as the pop of black in the mood board.  I found the sticker ‘beautiful’ and just added the word ‘moments’ with some mini alphas.

Lastly, I added in a couple of butterflies and some enamel dots and called it done 🙂

Upload to the Facebook group by the end of the month for your chance to win a prize pack from this months sponsor.

This month’s sponsor: D-lish Scraps.

Until next time,


SUMMER DAYS | ENDLESS SUMMER | GWEN WRUCK

Hi Creative Friends,

I hope you are all doing well!  I’m on the Cocoa Vanilla Studio blog today with another share for you, this time for our ‘Holidays/Vacations’ theme.  For this page, I couldn’t go past the Endless Summer collection. The photo for this page was taken on a recent trip to Sydney for a cruise over the Summer holidays. **A little side note, this collection is still available as a bundle here for just $15!!**

I don’t have a lot of this collection left in my stash as it is from 2016, just one full 12 x 12 pattern paper ‘Sunbleached’.  It’s a really pretty ombre so perfect for a background.  I did also have a few half sheets and scraps, so pulled out a cut file to help stretch the pattern paper a little further.  These two cut files are from CUT to YOU.  Summer Days and Sunny Skies.

I then went about backing both the cut files with a mixture of papers, including ‘Sweet Treats’ which is a woodgrain and ‘Chill’ which is a lovely mint green stripe and floral B side. I just mixed and matched the papers making sure to alternate so that no two patterns were side by side.

Now, you can also see that some of the clouds were not backed, this is because I ran out of pattern paper, I’ve just been strategic in choosing which ones to leave unbacked, so you can’t tell; it just looks as though it was part of the design and meant to be that way.

I have also raised up the cut file, just to give it some dimension off the background of my page.

For the title, I backed it in just the two pattern papers to separate out the words a little.

Next up, I’ve mat my photo and stitched around the edge as I normally do and then positioned the two cut files and my photo on the page.  It was now time to find some matching embellishments to finish the page off.

I did have some of the Accessory Stickers left in my stash so I’ll pulled a couple of those, I also have some of the ‘Die Cut Ephemera‘ and I’ve added a few pieces of those as well.

I’ve also added some of the ‘Wood Veneer’ pieces – they are a perfect match for this collection, the wood used is so warm in colour and they are the perfect dimension for adding interest but not making the page too bulky.

I’ve also cut some elements from the ‘This and That’ pattern paper; a great buy if your looking for little elements to add to a page.  I also had this paper flower from the ‘Summer Blooms’ pack.  The enamel heart is from the ‘Free Spirit’ collection; I dug deep into my stash to find that one!

Lastly, I’ve added in some enamel shapes from the collection and called the page done.

Thanks for popping by today, I hope our current theme inspires you to get some of your Holiday/Vacation snaps documented and onto layouts; I know I for one have so many of these unscrapped so it was fun to play along and I’m really happy with how the page turned out.

Until next time,


Happy International Scrapbooking Day!

Hi Creative Friends,

Popping by to say a big Happy International Scrapbooking Day!  I do hope you are all busy in your creatives spaces cropping up a storm, or out with your loved ones taking photos to scrap 🙂

I have something a little bit different today.  I’m sharing my page created for CUT to YOU using one of their International Scrapbooking Day FREEBIES.  They have two available this weekend only, I’ll pop a link to the blog with the details here.

For my page, I wanted to document my craft space.  This is the second craft space I have had and didn’t really take any photos of the first one (which I regret)… so for this space, I have taken a few and went about documenting.  The FREEBIE title was perfect for this; my creative space really does make my heart happy.  I’ve used the Kaisercraft Paisley Days collection for my page, I love the tones in this collection, and they coordinate with the colours in my craft space really well.

To create the page, I began by backing my cut file with a mixture of the pattern papers.  I just went about choosing randomly, making sure no two colours were side by side.  I then created my background using white cardstock from my stash and the ‘Smiles’ pattern paper.  I’ve also used this paper to mat one of my photos for a consistent look.  I’ve used ‘Groovy’ for the other photo, it has a very pretty shade of minty blue.  I’ve added 3D foam to the back of the cutfile to raise it up off the background of my page.

I then went about pulling out elements from the Ephemera pack as well as the sticker book to make up my floral clusters.  I love how the sticker book has more than one sheet of each design, I often go looking for multiples of flowers and butterflies etc. to give balance and cohesion to the page.  Many sticker books only have one sheet of each design.

So, I’ve just kept pulling out elements from the collection, mixing and matching until I was happy with the placement and then glued everything down.  For some of the elements I’ve used 3D foam tape for dimension, others are flat on the page.

Lastly, for some more dimension, I’ve placed a Curios… these are small glass baubles which have a really nice shine and add to the interest on the page.  A great finishing touch.

Thanks for popping by today and checking out my space and inspiration for the CUT to YOU Freebies.  I hope you have followed the link and grabbed yours.

Until next time,


UNIQUE HAPPY DAYS | BOHEMIAN DREAM | GWEN WRUCK

Hi Creative Friends,

I hope you are all doing well!  I’m up on the blog today with another share for you.  For today’s post I really wanted to share a page featuring my sister and I as today is her birthday!  We get along super well and frequently go on adventures… all of which almost always involve selfies.  They don’t always work out that well, but when they do, it’s really fun to scrap them.

The inspiration for the page came straight from the photo… as soon as it was ‘snapped’ I knew I wanted to use the ‘Bohemian Dream‘ collection to make my page; I knew it would be the perfect match to the colours in the picture.  It’s like they were made for each other!

Next, I had the idea to use this cut file from CUT to YOU… this is available in store, but was also one of their freebies for Newsletter subscribers and it’s called “Speech Bubble”.   I thought it was a nice play on the fact that this photo is taken with a Snapchat filter.


I’ve been working with this collection for a while now, so I did have a few sheets of pattern paper that had been cut into that I wanted to use up… but first for my background, I started with the ‘Abstract‘ paper.  I’ve used this to create the border for my page and to back some of the speech bubbles in the cut file.  I then pulled out scraps of ‘Dreamer‘ and ‘Wild and Free’ papers.  I’ve used the white spotty paper from the paper pad for the small hearts and a paper bow I’ve made with a die from my stash as I was keen to use a smaller print for those.

Once the cut file was backed, I matted my photo, again using the ‘Abstract‘ paper and mounted it on foam for dimension.  I positioned my cut file and added it to my background and placed my photo on top.  It was then just a matter of finding a title and those finishing touches for the page.

I’ve gone straight to the Chipboard Titles to find a title for my page.  I just love these, so easy to use and all of the words are so versatile, a must for any Cocoa Vanilla stash!  They are super sticky too, so no fussing with wet glue to make sure they stay stuck.

I’ve then gone through the Ephemera pack to add a few pieces to my page, including floral pieces and a sentiment banner.  I’ve also added a Flair badge and some stickers from the Accessory sticker sheet and I’m happy now with how everything looks.

Thanks for popping by today, this came together really quickly and I hope you love this page as much as I do… If you’re after some FREE cut files, be sure to sign up to the CUT to YOU Newsletter (you’ll find the link on their website home page – here) AND a special HAPPY BIRTHDAY SIS, you’re awesome, love you lots!

Until next time,

“So Happy We’re Here” for Scrap the Girls May 2019

Hi Creative Friends,

Back today to share with you the latest challenge for Scrap the Girls.  This month we have a sketch provided by the amazing Sue Plumb!  I love a sketch, so easy to get creating with and you can get so many different pages out of the one design.  For this page, I wanted to work with a photo my hubby took of my daughter and I recently when we were on vacation.  Here’s a look at my page…

and this is the sketch!

Look at all of those stunning florals!!  To start the page, I knew I wanted to use a bit of a bolder background and some CUT to YOU digital cut files.  I’ve chosen the ‘Bouquet‘ file… it’s one of my favourite cut files, I’ve used it quite a few times now and cut it out of a cute floral pattern paper, this one by Pink Fresh Studio which was part of a kit I purchased from Kitaholics Kit Club.

I matted my photo and then positioned the floral pieces around it, loosely following along with the sketch, but shuffling them here and there to where they looked good.  I then attached them to the back of my photo so that I could move this entire piece around.  I also added here a second photo mat, this time in the minty blue for contrast.  This allowed me to move this whole element around my page until I was happy with its position.

Now this main piece was locked in, I went about finding my title.  This collection by Pink Fresh Studio is called ‘Everyday Musings‘ and it has some really lovely sentiments in it.  Not travel inspired as such, but perfect for this happy photo of us on holiday.  I went with a die cut piece from their ephemera pack and positioned it to the right of the photo following along with the sketch.

I just LOVE love LOVE this sentiment (pictured above) and knew I had to fit it in, so I tucked it under my title as a bit of a sub-title idea.  Next, I wanted to add some elements to the left-hand side edge of my photo following along with the sketch.  I’ve tucked in a frame from the collection and a tab, a die cut piece and even made a sweet paper bow.

I’ve also added in some other floral pieces at this point, also from the die cut pack.

and how perfect were these two elements?

The page was looking really good at this point.  So I was really just looking for a few small finishing touches.  I decided on two of the bright yellow puffy floral stickers.  I love how these pull the yellow out from my background layers.  Yellow is such a pretty happy holiday colour!

Lastly, I’ve added some enamel dots around the main cluster just to finish off the page and I really like it!  I think it’s a cleaner version of the sketch, but that’s the beauty of sketches; you can adjust with them however you like.

Upload to the Facebook group by the end of the month for your chance to win a prize pack from this months sponsor which happens to be my store CUT to YOU. We have digital cut files for those of you with electronic die cutting machines and custom cut files for those of you who would like us to cut them for you and ship if you don’t have an electronic cutter.  Everyone can use cut files in their scrapbooking.

This month’s sponsor: CUT to YOU – Digital Cut files for all kinds of paper lovers.

Until next time,